Saturday, 4 December 2010

Enhancing security at Coffee Shop (B)

"Oh, what if I don't have a VPN server at home? What can I do?"

The main issue of Internet link provided by Coffee shop (Public network) is that everyone can access the Access Point (AP)

* Web
You might know it is best to access a website with HTTPS (Hypertext Transfer Protocol Secure) instead of HTTP. But how?

For Chrome browser: "Use HTTPS"
https://chrome.google.com/extensions/detail/kbkgnojednemejclpggpnhlhlhkmfidi

For Firefox browser: "HTTPS Everywhere"
https://addons.mozilla.org/en-US/firefox/addon/229918/

It is also important to know that Facebook offers https access, so installing the "force https" when accessing facebook.com will let you enjoy a more secure web browsing experience.

* Email

Email is one of the oldest product since Internet was invented. All messages are sent via plain text, which obviously not suitable for today's security standard. Therefore, it is necessary to further enhance the security by introducing Transport Layer Security (TLS). The network ports used are listed as below

- TCP 465 SMTP over TLS/SSL

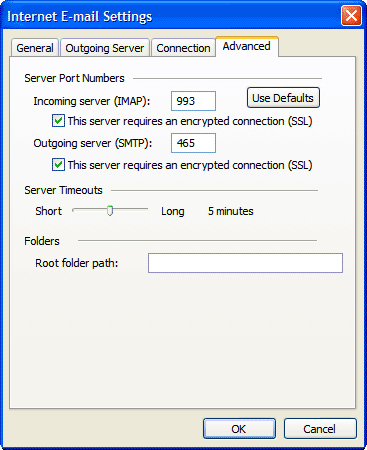
- TCP 587 SMTP over TLS/SSLSTART

- TCP 993 IMAP over TLS/SSL

- TCP 995 POP3 over TLS/SSL

# Pictures are provided by mail.google.com

If we take Gmail as an example, we can find the setting is easy to make.

Related material: Enhancing security at Coffee Shop (A)
http://infosecmatrix.blogspot.com/2010/12/enhancing-security-at-coffee-shop.html

Friday, 3 December 2010

Enhancing security at Coffee Shop (A)

WiFi is a two-sided sword, it provides a great mobility of Internet access for us, but it also allows us to intercept others data easily. This is the fact, the only thing that we can do is to try our best to protect our data from being exposed instead.

The best way is to make a virtual private network (VPN) connection to your home desktop/server. This solution will let you to enjoy the same security as you are at home. However, for sure, you have to confirm the security of your regular channel from home to external servers.

The following diagram illustrate the solution.
Insecure way: connecting via Insecure Channel
More secure way: connecting via Secure Channel (VPN) to your home


Further reading: How to setup PPTP server with your Windows XP

Related: Enhancing security at Coffee Shop (B)

Wednesday, 1 December 2010

How to setup PPTP server with your Windows XP

Note: If you just need a quick look of how to setup the PPTP server with WinXP, just skip the introduction part and start with the pictures.

I need to access my home desktop through a secure communication channel, what can I do?

If you want to setup a VPN server at home, you can consider to choose either PPTP or SSL VPN. Setting up a SSL VPN server involves maintaining a Certificate Authority (CA), Registration Authority (RA), Certificate Revocation List (CRL) and Digital Certificates. These names are scary and are not friendly to many people......

Therefore, we will go for an easier way, which is setting up a PPTP VPN server. But now, we have come up with another question, what platform should we build on, this can be either


  • Windows
  • Linux
  • Dedicated firmware (DD-WRT)

Linux is powerful but not many people will build a linux server or VM at home.
DD-WRT is easy for user to setup but it requires the user to modify the firmware of their router.
Windows is popular and user can deploy the setting with just a few minutes. Therefore, it makes the ideal choice to do the job.

Step 1. OPEN the Network Connection

Step 2. BUILD a new connection

Step 3. CLICK "Next" 

Step 4. SELECT advanced connection

Step 5. SELEC accept incoming connection

Step 6. SELEC allow virtual private connection

Step 7. CLICK "Property" to make advanced setting

Step 8. INPUT the IP range that is free of your current network

Optional: You may check the property of this profile if encryption is enabled, you can also maintain a list of PPTP users at the same page. 


At this point, your computer is ready to provide PPTP VPN service to yourself and others.

Monday, 29 November 2010

Python Lab - Sending Email using Python script and Gmail SMTP server

When we need to generate an alert from our program, most likely we will send it by EMAIL or SMS. Today, I am going to do it in a cheapest way: Gmail + Python.

The things that we need to do is to replace the highlighted values.

*************************************************************************************
import smtplib

def send(subject="", msg=""):

    # recipient
    rcpt_to = 'recipient@gmail.com'
   
    # login parameter
    gmail_username = 'sender@gmail.com'
    gmail_password = 'password'
   
    # login sever
    gmail_server = smtplib.SMTP("smtp.gmail.com",587)
    gmail_server.ehlo()
    gmail_server.starttls()
    gmail_server.ehlo
    gmail_server.login(gmail_username, gmail_password)

    # Email header
    sendhead = 'From: Sender <' + gmail_username + '>\n'
    rcpthead = 'To: Recipient <' + rcpt_to + '>\n'
    subject = 'Subject:' + subject + '\n'
    msg = sendhead + rcpthead + subject + '\n' + msg + '\n\n'
   
    gmail_server.sendmail(gmail_username, to, msg)
    gmail_server.close()

if __name__ =='__main__':

        msg = raw_input("Please enter the msg: ")
        subject = "Testing Alert"
        send(subject,msg)

Thursday, 18 November 2010

Diffie-Hellman (DH)

It is used as key agreement protocol, aka exponential key agreement, which allows 2 users to exchange a secret key over an insecure medium without exchange prior secrets.

Key exchange is vulnerable to a man-in-the-middle attack

Normal
A ------------------------- B

MITM
A --------- M ----------- B

The main drawback is that DH does not authenticate both the parties.

For non-repudiation purpose, we will need to consider using digital signatures.

Reference: Official (ISC)2 Guide to the CISSP CBK, Second Edition ((ISC)2 Press)

Saturday, 16 October 2010

Diffie-Hellman

Diffie-Hellman is mainly used as key management protocol. For example, it is used for exchange keys in IPsec VPN.

It allows 2 parties, A and B, to exchange a secret key over an insecure communication channel without previous knowledge of the secret key.

Reference: Official (ISC)2 Guide to the CISSP CBK, Second Edition ((ISC)2 Press)

Advanced Encryption Standard (AES)

Advanced Encryption Standard (AES) is a symmetric key cryptography algorithm.


- Key size is either 128, 192 or 256 bits
- Block size is either 128, 192 or 256 bits


As increasing the key length and block size adds a little extra compensation, i.e. increasing the number of iteration of the algorithm, it is recommended to pick 256 bits instead of 128 bits.

Reference: Official (ISC)2 Guide to the CISSP CBK, Second Edition ((ISC)2 Press)

Thursday, 14 October 2010

Data Encryption Standard (DES)

The Data Encryption Standard (DES) is a symmetric key cryptography algorithm.

- Key size is 56bits + parity check is 8bits
- Block size is 64bits

DES modes
- Stream ciphers (implemented in hardware)

     * Cipher Feedback (CFB)
        Errors in this mode of DES will propagate

     * Output Feedback (OFB)
        Susceptible to block replay attacks

- Block ciphers (implemented in software)

     *  Electronic Code Block (ECB)
         A given plaintext will always generate the same ciphertext

     * Cipher Block Chaining (CBC)
        A given plaintext will always result in different ciphertext

Double-DES and Tripe-DES

- Doubling the key from 56bits to 112bits, the strength will increase from 2^56 to 2^112
- 2DES is susceptible under Man-in-the-middle attack which its strength is as same as DES
  2DES -> -> -> DES
- 3DES can use 2 or 3 separate keys.

     * DES EEE2 (2 keys)
      Encryption with key1 >>> Encryption with key2 >>> Encryption with key3

     * DES EDE2 (2 keys)
      Encryption with key1 >>> Decryption with key2 >>> Encryption with key3

     * DES EEE3 (3 keys)
      Encryption with key1 >>> Encryption with key2 >>> Encryption with key3

     * DES EDE3 (3 keys)
      Encryption with key1 >>> Decryption with key2 >>> Encryption with key3

Reference: Official (ISC)2 Guide to the CISSP CBK, Second Edition ((ISC)2 Press)
 

Sunday, 14 March 2010

Python Lab - Hello World

Python Lab - Hello World

This is a very simple program to get your very first step in python.

syntax:
print "put anything you like"

Step 1. Use VIM to create a new file "lab01.py" (Exhibit 1)
(Exhibit 1. Create a file)


Step 2. Put the path of Python and a simple print line (Exhibit 2)


(Exhibit 2. Program content)


Step 3. Add executable permission to "lab01.py" (Exhibit 3)

(Exhibit 3. Add permission)

Step 4. Run "lab01.py" and see the result (Exhibit 4)

(Exhibit 4. Result)

You can try to change the string to put whatever you like and re-execute the program.

Enjoy Lab01~!